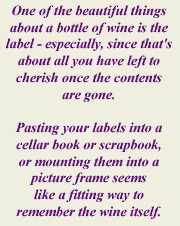
|
|
|
There
are more than a few ways to approach wine label removal. I've
heard about people soaking, peeling, cutting, and steaming the
labels off their wine bottles. I've even heard about people using
a hair dryer to soften the glue. (There's a description of some
of the many methods at Brad & Dri's Internet
Guide to Wine FAQ.) There is also a heavy-duty label-sized
adhesive tape usually advertised in the Wine
Enthusiast catalog. From its description, it looks like you
merely apply the tape over the label on the bottle and pull it
off (hopefully, getting all of the top part of the label). This
could be good if you're looking for a laminated effect, for something
such as coasters. Personally, I prefer the label's original finish,
and I've had a great deal of success at removing wine labels from
bottles by soaking them in hot water, and using a single-edged
razor blade as necessary to remove the label. Here is my method:
- Soaking:
Soak
the empty (should be obvious, huh?) bottles in a sink full
of hot water (not too hot, or you'll bleach some of the color
out of the label ). Add a "few" of drops of liquid detergent
to the water. If you do this in the kitchen sink, don't use
more than 2-3 drops or so, or the label will become mealy
and fall apart. After about 20 min or so, many of the European
labels will either already be floating on top, or be quite
ready to be lifted off the bottle. There are some exceptions
here; it seems that new adhesives are being used on most of
the recent Bordeaux vintages, yet many Rhone labels slide
right off in the water. Those labels that are not easily
removed (without ripping the label) require a little more
work. Here's what I do:
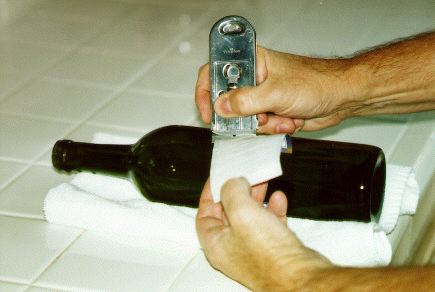
- Removal:
(see pictures)
After
about 20 minutes of soaking, I remove the bottle from the
sink, dump out the water, and lay the bottle on its backside,
label up, neck pointed away from me, and cradled in a towel
to keep it somewhat immobile. Using a single-edged razor blade
in a metal
holder
(ie. paint scraper), I work in full even strokes, drawing
the blade under the label from the top down and towards me.
Obviously, the trick here is to have the correct blade angle
to the bottle, or you merely slice the label, or worse yet,
your hand. I've been doing it this way for several years.
I've never cut myself, and am nearly always able to remove
a label in less than a minute or so, and the label usually
stays in excellent condition. (Those labels with foil in their
color scheme will probably end up with a series of slight
vertical creases from the blade action, but not unduly so.)
If
necessary, I remove any residual glue or adhesive in the sink
water, before laying the label on paper toweling to momentarily
air dry. I then blot the labels dry. While still damp, I place
them into an acid-free photo blotter book, and place a small
stack of books on top to keep the whole thing flat.
|
Caution
- self-adhesive
labels:
When drying or blotting the labels, watch out for the
newest self-adhesive types (Rabbit Ridge and Rosenblum
come immediately to mind). Some things I've noticed:
1) the required
soaking time is less - they really only need about 10
minutes in hot-very warm water.
2) I've also found
that very cold water seems to work just as well with
some of these labels. (In fact, I've even found them
floating in the water after 20 minutes or so. Plus,
they seem less sticky to handle if removed with cold
water.)
3) once the label
is off the bottle, the self-stick adhesive is still
active and as sticky as fly paper. In fact, the darn
label will stick to anything! Do not blot them,
yet!
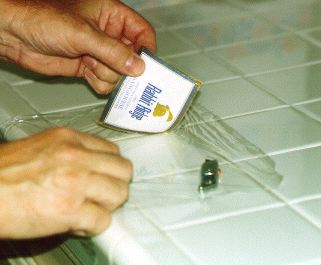 |
You
can dry them one of two ways:
1) carefully slide
the still-face-down label onto a counter surface. Tear
off a piece of Saran Wrap or other plastic wrap (see
pictures on this process), and stretch it smoothly
over the backside of the label.
2) or preferably, lay down a piece of
plastic wrap first.
Then just "paste" the label right on top of
the plastic wrap.
Flatten
the label so that the plastic wrap will now become your
back-of-label surface, and trim off the excess plastic
wrap. Now you can put the label into your blotter book
without fear of it staying in there for good.
Another successful method has been to stick the label
down to some plain white paper*, rather than the plastic
wrap.
|
After
a couple of days of drying in the blotter book, I take them
out and place them temporarily into an acid-free photo box
or book for future use.
- Mounting
and/or Displaying: (see pictures)
Later
on, when I have all of the labels I want to display (ie. verticals,
or Napa Valley, or Bordeaux), I use a glue-stick to glue them
down to a colored matt board. I then mount the board in a
picture frame, hang it on the wall, and voila...there you
have it! Your own labels, up on the wall for all to see. Then,
when your guests ask if those labels are from wines you drank,
you can say, "...you betcha'," or, "oui, oui," or "please
pass the Grey Poupon."
|
*There's
been a recent trend toward the use of archival
methods to store or display pictures, photos,
and other keepsakes. This involves using "acid-free"
mounting materials (matting, paper, adhesives, etc.),
in order to keep the picture or photo from deteriorating
(fading, turning brown). Ordinary mounting materials
contain acids that will ultimately cause deterioration
to the mounted item. This kind of deterioration is most
easily seen in the non-acid-free matts used in the framing
of pictures -- the inside edge of the matt starts to
turn brown. Deterioration of the picture itself will
also happen, as the acids from this type of product
tend to leach into your mounted product. The time it
takes for this to happen can vary, but keep this in
mind when mounting labels.
So,
I suggest you use archival or acid-free products if
there is the slightest chance you'll ever want to remove
the labels to re-mount them elsewhere, or if you just
want them to retain their vivid colors.
|
- Scanning
and/or Posting:
Obviously,
soaking or scraping a label off the bottle is out of the question
where etched or painted bottles are concerned. In these cases,
I just take a close-up photo of the label portion of the bottle.
This can then be cropped and mounted, or scanned and printed.
Speaking of scanning, after seeing several examples of scanned
labels posted on websites, it occured to me that there is
a lineage to labels or a historical story that could be told
about a winery through its wine labels. The evolution of a
winery's label is often fascinating to see, and what better
medium to view this than scanned images over the web. So,
I tried scanning a few myself (wine
label scans) to see what could be done. Now, I'm more
convinced than ever that getting these labels or their images
off the bottles is a worthwhile pursuit.
In
closing, to those who haven't tried this soaking process, I'm
sure the whole thing seems daunting. But, I can assure you that
it's actually quicker than the time it took me to write these
instructions! I've got the whole soaking/removal process down
to about 25 min for 4 bottles -- start to finish. That's a small
price to pay for the final product. Sure, you could pick up or
order some labels from the winery, and I've done that too. (In
fact, I've even taken empty bottles away from tastings that I've
attended, if they had a desirable label.) But, there's something
special about these labels. You drank that wine! You soaked
off that label! There's that "pride of ownership." Plus, they
might have some cool dribble stains that you put on the label!
One final note: Don't be tempted to bite off more than you can
chew -- I'd suggest doing this process in small lots of 3-4 bottles,
especially at first.
|
|